#so it's not as simple as “try this food!” is it kosher
Explore tagged Tumblr posts
Visit Tumblr Blog
Explore Tumblr blogs with no restrictions, modern design and the best experience.
Last Seen Tumblr Blogs


Fun Fact
Mobile Tumblr US users spend an average of 4.04 minutes per session on the app.
Text
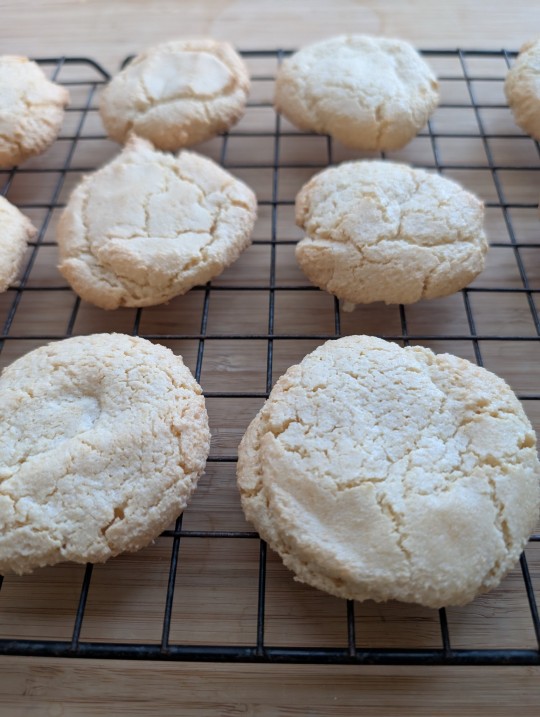

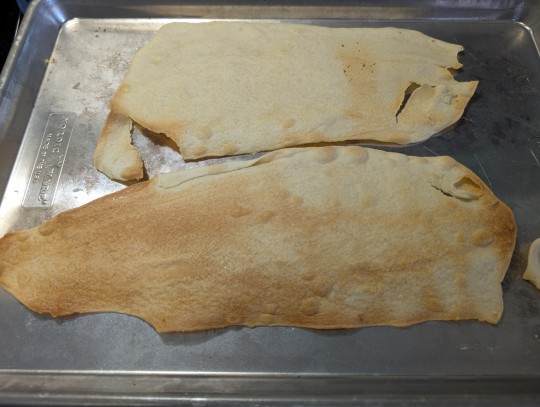
[ID: Three images of my recent baking exploits; the top two images show a baking sheet with row upon row of shiny meringues, and another with several rows of almond macaroons. The bottom image shows two large sheets of thin, golden-brown matzoh.]
Some of my baking from the past few days! I've been making a semolina dish which requires two egg yolks, so I've been saving up the egg whites for making meringues and almond macaroons, both of which are very simple -- one is just egg whites beaten with sugar and vanilla, while the other is almond paste beaten with sugar and then an egg white.
The matzoh isn't technically kosher for Passover since it's made by a gentile and a Rabbi didn't supervise the making of it, but I wanted to try my hand at making it myself anyway. With bake time it took me exactly 18 minutes, but I also had the help of a food processor for making the dough and a pasta roller for rolling it -- I have no idea how people managed it that fast without kitchen appliances, though I imagine it was an assembly line situation.
It's not like it's any more flavorful or has a particularly better texture than store bought, but the adventure was fun!
109 notes
·
View notes
Note
hey man do you have any banging cinnamon recipes
Yes! Below are my recipes for Monkey Bread and Gooey Cinnamon Rolls.
They use the same enriched dough for a base. You can also use this dough for cinnamon babka, other types of sweet rolls or buns, etc.
Also here’s some recipes I want to try:
- Brown Sugar Cinnamon Shortbread (made this, it rocked)
- Cinnamon Roll Focaccia
- Pumpkin Cinnamon Sourdough
- Coffee Cake (King Arthur’s Recipe of the Year!)
Also check the giant apple pop tart thing I made in a recent post tagged “food” it was so good.
MONKEY BREAD
MAKES: 1 bundt pan (if no bundt pan, use 9x13” pan)
INGREDIENTS
DOUGH
3 ½ cups (420g) AP or bread flour
2 ¼ tsp (1 packet, 7g) instant or active dry yeast
1 cup (227g) full-fat milk, warm
2 Tbsp (25g) sugar
2 Tbsp (28g) butter, melted
1 egg, beaten
1 tsp kosher salt
CINNAMON SUGAR
½ cup (100g) white sugar
1 Tbsp cinnamon
BUTTERSCOTCH SAUCE
1 cup (200g) brown sugar
½ cup (113g) butter
1 tsp salt
¼ cup heavy cream or evaporated milk
DIRECTIONS
In a large bowl (or the bowl of a stand mixer), whisk together yeast, milk, and sugar. Cover and let sit 5 minutes until frothy, then whisk in butter, egg, and salt.
Add flour and mix for 2-3 minutes to form a very moist, sticky dough.
Let dough sit untouched in bowl 5 minutes so flour absorbs moisture. After resting, dough will pretty much immediately be smooth and workable instead of too sticky.
Transfer dough on a clean, floured surface. Sprinkle flour over the top. Knead, dusting lightly with flour as needed, until dough is soft, smooth, elastic, and springs back to form in 2-3 seconds when poked, 6-7 minutes.
1st Rise: Cover and let rise 1.5-2 hours until doubled in size.
Near the end of 1st Rise: Grease a bundt pan. Combine cinnamon sugar ingredients in a bowl.
Make butterscotch sauce: In a saucepan, combine brown sugar, butter, and salt. Bring to a boil over medium heat, whisking frequently. Turn off heat. Slowly pour in heavy cream (it will froth and spit). Stir until smooth. Put back on the heat until it reaches 240°. Then set aside.
Once dough is risen, pinch off bits the size of donut holes. Roll each dough ball liberally in the cinnamon sugar, then drop into pan. Halfway through, pour ½ of the warm butterscotch sauce over the dough balls. Reserve the other half. Sprinkle any leftover cinnamon sugar over the dough balls at the end.
2nd Rise (Proof): Cover and let rise until visibly puffy, 20-30 minutes.
Preheat oven to 350°. Once dough is proofed, pour remaining ½ of butterscotch sauce over the top. Shake gently to make sure sauce sinks to the bottom.
Bake 35-40 minutes until top is a deep golden brown.
Let rest in the pan 15 minutes. Then carefully flip monkey bread onto a large plate. (If you remove too early, the sauce will be runny. If you remove too late, it will stick instead of coming out easily.)
Serve warm.
NOTES
- Butterscotch is just caramel but with brown sugar instead of white.
- Many recipes use a simple butter and brown sugar sauce, but it can result in a grainy, crystallized texture. Add cream and heat all the way to 240° to get a gooey, silky caramel texture.
GOOEY CINNAMON ROLLS
MAKES: 12 rolls (1 x 9x13” pan)
INGREDIENTS
DOUGH
3 ½ cups (420g) AP or bread flour
2 ¼ tsp (1 packet, 7g) instant or active dry yeast
1 cup (227g) full-fat milk, warm
2 Tbsp (25g) sugar
2 Tbsp (28g) butter, melted
1 egg, beaten
1 tsp kosher salt
FILLING
1 cup (200g) brown sugar
½ cup (113g) butter, very soft
2 Tbsp cinnamon
optional: 1 cup chopped walnuts
+
½ cup heavy cream or full-fat milk, warmed right before rolls go in the oven
optional: Vanilla Glaze (1 cup powdered sugar, 1-2 Tbsp milk, 1 tsp vanilla. Stir until smooth.)
DIRECTIONS
In a large bowl (or the bowl of a stand mixer), whisk together yeast, milk, and sugar. Cover and let sit 5 minutes until frothy, then whisk in butter, egg, and salt.
Add flour and mix for 2-3 minutes to form a very moist, sticky dough.
Let dough sit untouched in bowl 5 minutes so flour absorbs moisture. After resting, dough will pretty much immediately be smooth and workable instead of too sticky.
Transfer dough on a clean, floured surface. Sprinkle flour over the top. Knead, dusting lightly with flour as needed, until dough is soft, smooth, elastic, and springs back to form in 2-3 seconds when poked, 6-7 minutes.
1st Rise: Cover and let rise 1 hour until larger (if not doubled) in size.
Make filling: Beat all ingredients together into a smooth, dark paste.
Roll out dough: On a clean, floured surface, roll out dough into a large, ½”-thick rectangle about the size of a baking sheet, 12x17”. The thickness is more important than the size.
Spread filling over the dough in an even layer. Leave ½” of space at the edges, and 2” of space along the bottom for easy sealing. (If using walnuts, sprinkle over top.)
Starting at the top, tightly roll up the dough lengthwise. It helps to start in the upper corner and go sideways first, then straighten out. Roll tightly to avoid gaps. Pinch the dough to seal along the seam.
Using a large, sharp knife or unflavored dental floss, slice the roll into 12 pieces. If they get a bit misshapen, just pat back into shape as you go. They don’t have to be perfectly round.
Proof: Arrange the rolls in the pan. Cover and let proof for 30 minutes until puffier.
Preheat oven to 375°.
Pour the warm cream or milk over the tops of the proofed rolls, letting it pool in the bottom of the pan.
Bake the rolls for 25-30 minutes until the tops are golden brown.
Let rest in the pan for 15 minutes before removing. If using Vanilla Glaze, drizzle over the rolls while they’re warm but not hot.
NOTES
- Same dough as Monkey Bread. I’ve experimented with richer enriched doughs (most recipes use more sugar and 2 eggs in the dough) but I tend to find them too cakey. I prefer a soft, almost stretchy, bready cinnamon roll.
- Pouring warm milk over the rolls before baking = soft, moist, and gooey.
- I’ve found that baking at 350 takes too long for the tops to get golden brown. I go for a higher temp (I’ve gone up to 400) to avoid overbaking.
40 notes
·
View notes
Text
Ingredients you do NOT need

I made a brief post about some tools you can probably pass on in the kitchen. You can find that here if interested. But I thought I'd get more controversial and talk about ingredients. Now, this is not a list of ingredients you should never get. This is more about stuff you really don't need to keep on hand that I find a lot of newer kitchen witches might think they need it.
Vanilla Beans Have you ever bought a vanilla bean? They are so expensive! For day to day stuff, it's not worth it. Just get some vanilla extract. If you want the magical properties, maybe invest in real vanilla extract. I get a big bottle as a gift from my Step Mom when she travels. But if you're just wanting vanilla flavor, just get the artificial stuff. Some people are put off by the fact it's made with things like beaver glands or waste molecules, but I think that's pretty amazing personally. Vanilla tip: add to your food when it's cool. Heat breaks down some of vanilla's complex flavor.
Saffron This is literally the most expensive seasoning in the world. It's the center prong things of a flower. But each flower only has 2 or 3 of them. If you're making something super special and want to get some, go for it. But you don't need to keep it on hand. Magically there are alternatives. Taste there are alternatives. If you want that colour, use some dried turmeric.
Multiple Salts It may seem weird that a Kitchen Witch is telling you not to keep salt on hand. But I'm saying don't keep ALL the salts on hand. There are multiple different kinds and colours of salt that can be added to food. Volcanic black salt, red salt, gray salt, pink salt, rock salt, flakey salt, TONS of salt. I hyper fixated one day and got them all. You know what I use in my cooking most often? Simple kosher salt. Got a big box of it for like 2 dollars. Salt is important for cooking; but don't get carried away.
Cooking Wine Cooking wine has alcohol in it, but it's at a higher concentration so it's cooked out faster. This can cause the cooking wine to taste like a weak vinegar as a result. Either use wine to cook with, or use it's red/white wine vinegar counter parts (in smaller amounts). You don't need special cooking wine. And wine vinegar can be used in ways cooking wine can't, like in dressings.
Shelf Stable Parmesan Cheese I get it, I grew up shaking this stuff on my pasta as a kid too. But that's really the only thing you can use it for. It's dehydrated cheese, so it should be refrigerated after opening. And it only lasts about half a year. You can't use it like regular cheese as it won't melt. And it's basically not cheese anymore so it's magical benefits are out the window. An alternative I recommend is nutritional Yeast. It has much more versatility and is actually shelf stable. It is transformative, expands ideas, allows for growth, change, and uplifting.
Truffle Oil I saw this everywhere a few years back. I think the hype has died down, but if you're still clinging to your truffle oil; just get olive oil. That's all it is. Truffle oil is Olive oil that's been infused with truffles. If you're lucky; a lot of the time it's just added chemicals to mimic the aroma. You can make your own if you want a little bit of truffle oil for something. Or you can experiment with infusing oil with other flavours. I think that's more fun.
Things you don't eat on the regular Look, there's nothing wrong with trying something new. You're at the grocery store, see something interesting, and want to try it. Fine, that's a great thing to do. But have a plan. Don't do something like look at all the jars of curry pate, and decide to grab a few flavors despite never making curry before. Cause most recipes you look up for curry are not going to include the step for adding store bought curry paste. So now these jars of curry paste are just taking up space in your kitchen. Or you see a spice you've never tried before. Don't buy the huge bag of it. Get a smaller quantity. Sure, the larger bag may be more bang for you buck. But you have no idea if you like the spice, if it pairs well with your cooking, or if it resonates with your magic intentions. And yeah spices don't go bad, but they do go stale.
#food and folklore#kitchen witch#kitchen witchcraft#food magic#house witch#witch#cooking tips#cooking#cook#home cooking#you don't need it#klickwitch#pagan#magick#witchcraft
26 notes
·
View notes
Text
Mom’s Fancy Chicken
Chicken Milanese
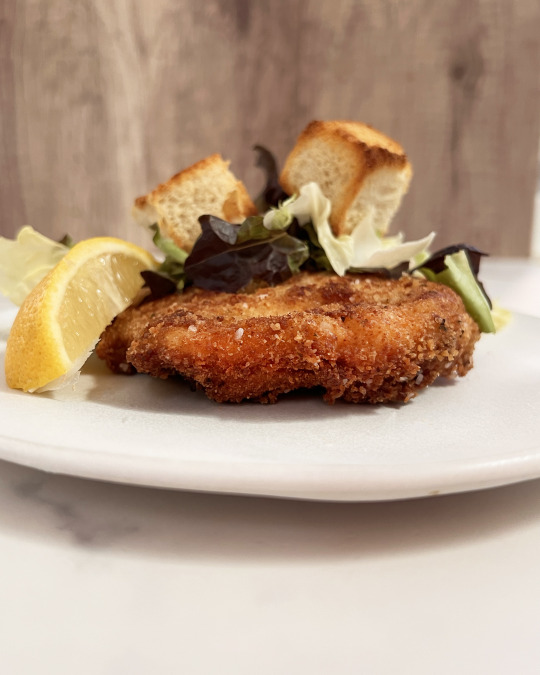
Juicy chicken covered in a crisp crust of toasty bread crumbs offers a world of possibilities. The first time I made it when I was young, I believed I had made a gourmet meal. I also wanted to make it again immediately and add my own stamp. It is a really low effort with a big reward, very simple, clean in flavor and it is asking to be dressed up and go to a party.
If my mother was making it, one knew something fancy was going on. Three bowls are required for the breading process and she was not one to make extra dirty dishes lightly. That third bowl of breadcrumbs is where the possibilities of flavor exist. Try to buy boneless chicken breast in bulk. Freeze them individually and you will always have the beginnings of a great meal. Including this fancy chicken, also known as Chicken Milanese.
Fancy Chicken
Serves 4
2 large eggs
¼ cup of milk
kosher salt and ground black pepper to taste
1 cup all-purpose flour
1½ cup Italian seasoned bread crumbs
2 skinless, boneless chicken breast halves, sliced horizontally for 2 thin pieces per chicken halve. There will be a total of 4 pieces of chicken in the end
½ cup vegetable oil for frying
Preheat the oven to 200 degrees F. (to keep cooked pieces warm while finishing up the remaining pieces).
Beat eggs with the milk, salt, and pepper in a shallow dish. Place flour in another similarly sized dish and bread crumbs in a third dish.
Place the chicken between two pieces of plastic wrap or in the middle of a large baggie. Use a meat pounder to lightly pound the chicken out to be one thickness (if you do not own a meat pounder try a small saucepan, that works for me). You are not necessarily looking to be thinner but the one thickness is important so it cooks evenly.
One piece at a time, gently press chicken into flour to coat and shake off any excess. Dip into beaten eggs, then press into the bread crumbs. Place breaded chicken onto a piece of parchment or waxed paper while breading the rest of the chicken.
Heat vegetable oil in a large skillet over medium heat. Pan-fry chicken in batches of 2 or 3 pieces at a time (depending on the size of your pan) until golden brown and no longer pink in the center, 3 to 4 minutes per side. There should be a nice gentle sizzle while it’s frying, adjust the heat up or down as you go. An instant-read thermometer inserted into the center should read at least 165 degrees F. Transfer the cooked chicken to a baking sheet and keep it in the warm oven while cooking the remaining chicken. Simpler than you think.
Ways to mix up the flavor. Start by looking at your breadcrumbs.
Use Italian Bread Crumbs instead of plain.
Add 1 teaspoon of lemon pepper to bread crumbs.
Add 1 teaspoon of Seasoned Salt to bread crumbs.
Add 1 teaspoon of curry powder to bread crumbs.
Add 1 teaspoon of smoked paprika to bread crumbs.
Add 1 teaspoon of onion powder or garlic powder to bread crumbs.
Add a tablespoon of sesame seeds to bread crumbs.
Now look above and beyond breadcrumbs. Is there something crispy and crunchy you love? Could you grind it up and swap out the breadcrumbs in this recipe for it? Cornflakes are having a moment. Try grinding them up to a texture similar to breadcrumbs and use them instead. They will introduce a mild, nutty, and slightly sweet flavor to the dish. Pretzels? Ritz Crackers? Potato Chips would work too. Just skip adding any salt to the eggs. Be brave and try flavored potato chips like BBQ or Salt and Vinegar. Turn everything into alternate breadcrumbs in a food processor.
Make a Sauce for your Chicken, This is a light simple sauce with so many ways to adapt.
Remove all but 3 tablespoons of the oil from your pan.
Add 1 tablespoon of flour to the pan and stir until you see no more dry flour.
Put the pan over a medium heat and cook for 1 minute. It will look like a paste.
Add 1 cup of chicken broth and stir vigorously with a whisk (the whisk will help you prevent lumps).
Add ½ a cup of white wine and simmer for another 2 or 3 minutes (depending on how thick you like the sauce).
Taste and check for seasoning, does it want salt or pepper? Maybe a squeeze of lemon juice? Some hot sauce?
Try adding sliced mushrooms or finely diced shallots to your sauce. They can be cooked in the pan before you start the sauce.
Try adding 2 tablespoons of capers (I’m obsessed with capers).
Chopped sundried tomatoes work well too.
Any chopped herbs can be introduced at this point. This is your sauce, do what you want. Did you have a sauce that one time at a restaurant and you want to try a make it? Give that a try.
If you don’t have time to deal with making a sauce, try ½ cup of salsa (red or green), it can be heated up in the frying pan you just used and ladled on top. You can also warm up pre-made marinara spooned on top of the chicken and sprinkle it with mozzarella. Melt that cheese under the broiler. It can be called Chicken Parmesan without a beat. Look at you! You just made Chicken Parm.
Not feeling saucy? Serve a large pile of Caesar salad on top of your chicken and some French bread along the side. Fancy but easy dinner. You’ve got this. You made fancy chicken.

5 notes
·
View notes
Note
Do you think it would it be possible to make that Buttered Turnip Porridge the Kul Tiran innkeepers always have in stock?
You know, I actually DID try that! Turnips, as Mists of Pandaria indicates, are a bit of a divisive food, because they taste unbearably bitter to some palates. Fortunately for me, I don't have that sensitivity (but I do have the cilantro-tastes-like-soap gene. Sadness), so I can tell you that turnips have an earthy, sweet taste with a slight radishy spiciness, and while my experiments weren't anything I would have recommended to a Warchefs reader, they weren't at all unpleasant. Still, I'm going to impart a very simple soup recipe here, that I'm sure can be applied to turnips if you'd ever like to try it out and should somewhat approximate the dish in-game. I've made this with other vegetables like carrots and mushrooms and potatoes, and it's very satisfying.
-- In a saucepan, fry some chopped onion in butter or oil until the onion turns slightly translucent. Throw in some aromatic spices of choice (black pepper, crushed red pepper, garlic) if you like. Once you're there, add your chopped vegetables of choice and saute them a little along with the onion to cook them partway, and then sprinkle over some kosher salt, and pour in water or soup stock to cover the vegetables and bring to a boil.
Once it boils, lower to a simmer and cook until the vegetables are soft enough to pierce easily with a fork, then turn off the heat and either puree in batches in a blender, OR use an immersion blender in the saucepan itself. If you like some texture in your soup, reserve some of the cooked vegetables and onions while you blend the rest and then add them again. Taste your soup, season to your liking with salt, and add a bit of complementary acid to brighten the flavor (lemon or lime juice, or vinegar).
This is a really great way to use up produce, and if you add a bit of cream near the end, you can serve it as a first course at a nice party and no one will ever know that it took nearly no effort to make!
8 notes
·
View notes
Text
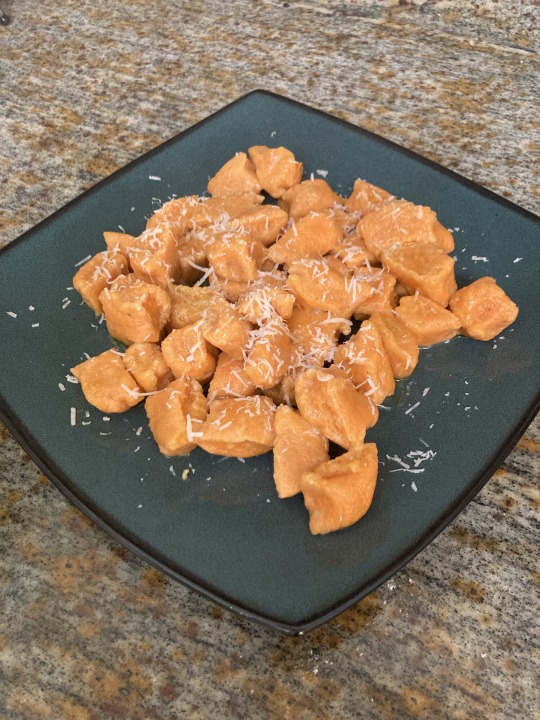
Sweet Potato Gnocchi with Marjoram-Almond Sauce whatever damn sauce you like - 5 Stars
Vegetarian (depending on what sauce you use)
Dairy free (depending on what sauce you use)
So this was one of the more interesting recipes I was dying to try out, mainly because of the gnocchi, which I've always wanted to make, but also to a smaller degree, the weird-ass sauce described here.
I've become no stranger to making sauces from scratch. After watching almost all of the Home Movies series with Alison Roman (who also wrote Volume 13 of the Shortstack series - Lemons!) I now am very familiar with building a sauce that is more like a paste that loosens up and emulsifies when the pasta or fat water hits it in the pan. So that's why I was curious to see what a sauce made up of primarily dry ingredients was meant to turn out.
Spoiler: it didn't turn out. While dried breadcrumb sauces are indeed a thing, this one is not. So don't bother with the sauce, unless you're some kind of sauce wizard -- I'll include the whole recipe here, of course, for those willing to try, but you'd be far better off with a your favorite jarred sauce (in my case I made a simple brown butter sage sauce).
Otherwise, the gnocchi are perfect, and very simple to make. The longest part was simply steaming the potatoes to the right level of tenderness. The dough came together quickly, and was quick to cook after that. Honestly, they were great just with a bit of olive oil and the Reggiano, as pictured below:
Ingredients for the sauce [that you should not bother making unless you are a sauce wizard or just prepared to fuck around and find out]:
2 tbsp extra-virgin olive oil
2 oil-cured anchovy filets
1/2 small red onion, thinly sliced into half moons
1 small garlic clove, finely chopped
Kosher salt and freshly ground black pepper
1 tbsp marjoram leaves
1/2 cup coarsely chopped unsalted almonds
1/4 fresh bread crumbs
2 tbsp roughly chopped pitted green olives
For the gnocchi:
1 1/2 cups steamed sweet potato flesh
Kosher salt and freshly ground black pepper
1 to 1 1/2 cups all-purpose flour, plus extra for kneading
1/2 cup grated Parmigiano-Reggiano cheese (about 2 oz), plus more to finish
Extra-virgin olive oil
Make the sauce: In a large skillet, heat the olive oil over medium heat. Add the anchovies and cook, smashing them with a spoon, until they dissolve into the oil, about 1 minute. Add the onion, garlic, 1/4 teaspoon of salt and a few grinds of pepper and cook, stirring, until the onion is very soft and slightly browned, about 12 minutes. Add the marjoram, almonds and bread crumbs and cook, stirring, until the bread crumbs begin to toast, about 5 minutes. Stir in the olives. Add more pepper to taste. The sauce should taste quite bold, but not overly salty (you'll be adding salted cooking water later). Keep warm over low heat.
Make the gnocchi: Fill a large saucepan with water and bring to a boil over high heat. Reduce the heat to medium high so the water stays at a steady boil. Season the water until it tastes a little less salty than the ocean.
In the bowl of a food processor, combine the sweet potato flesh, 1/2 tsp of salt and 1/4 tsp of pepper and puree until smooth. Turn the mixture out into a large bowl. Stir in 1 cup of flour and the Parmigiano-Reggiano. Add additional flour in small increments until the dough comes together and can be easily kneaded. Turn the dough out onto a floured surface and knead just until it stays together, about 1 minute. Don't knead the dough too much.
Pull off a small piece of dough and add it to the water. If the piece falls apart, add a bit more flour to the dough, then test another piece; repeat these steps, if necessary, until the dough doesn't disintegrate in the water.
Add more flour to the work surface, if needed. Cut off about one-quarter of the dough and, using your hands, roll it into a 1/2 inch-thick rope. Cut the rope into 1-inch-long pieces. Set the gnocchi to one side of the floured surface and keep them from touching. Repeat with the remaining dough.
Add about half of the gnocchi to the boiling water and stir to be sure the gnocchi don't stick together. Once the gnocchi bob to the surface, after about 1 1/2 minutes, cook them for an additional minute, about 2 1/2 minutes total. Transfer the gnocchi to a large serving platter. Drizzle with a little olive oil. Repeat with the remaining gnocchi.
Warm the sauce [or whatever sauce you are choosing] over medium-high heat. Add 1/2 cup of the gnocchi cooking water to the sauce [this is only if needed, you may not] and cook, stirring, until the liquid reduces into a loose sauce, about 3 minutes. Spoon over the gnocchi, then top with olive oil and some freshly grated cheese.
2 notes
·
View notes
Text
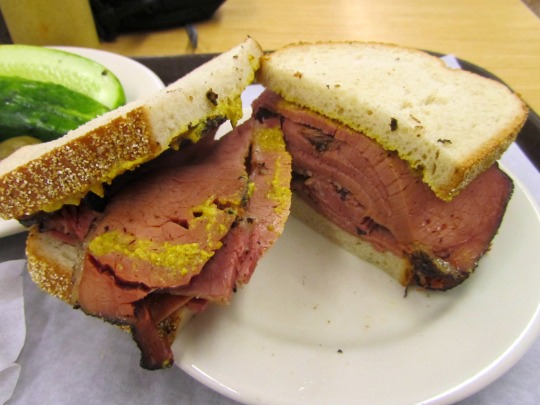


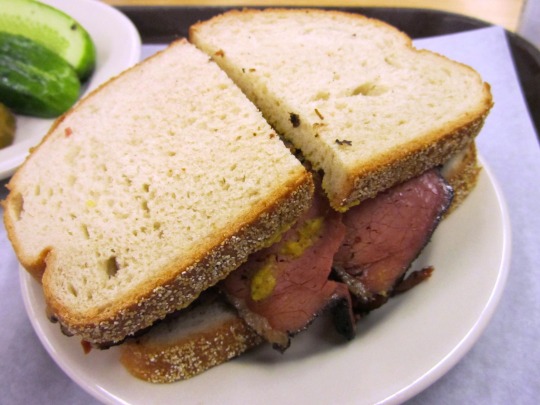

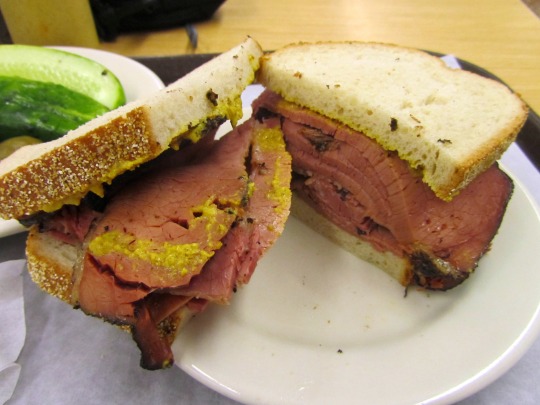
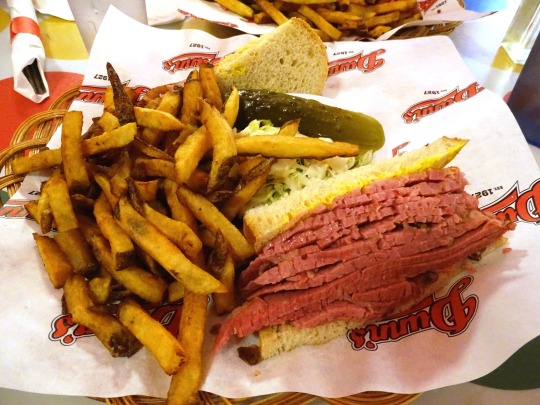
National Hot Pastrami Sandwich Day
There are few things that are more alluring for food lovers than the smell of a hot pastrami sandwich that is winging its way across a restaurant. For those that salivate at the thought, celebrating National Hot Pastrami Sandwich Day is a must.
National Hot Pastrami Sandwich Day is a celebration of the mouthwatering, edible treat that is the much-loved hot pastrami sandwich. A shining example of culinary beauty, this delicious delicacy is created using thin slices of piping hot pastrami that are served on rye bread, usually topped with melted Swiss cheese slices, a helping of Russian dressing, and a pickle on the side.
What some people might consider to be just a sandwich, other folks recognize this sandwich as the perfect (and only) reason to celebrate on this day. Get ready to enjoy National Hot Pastrami Sandwich Day!
History of National Hot Pastrami Sandwich Day
A staple must-try dish for those visiting the iconic American city of New York (where the sandwich originated), the hot pastrami sandwich has a rich history, and it has inspired many a chef to experiment with its treasured ingredients. It’s rare for a simple snack to bear such significance and carry such gravitas in the gastronomic world, and this is why National Hot Pastrami Sandwich Day came into being.
Pastrami is a very popular meat product, one that seems to have originated in the Jewish communities of Romania. Pastrami comes from the Romanian word ‘pastrama,’ which is a derivative of the word ‘pastra,’ a word indicating that a food has been conserved or preserved.
Usually made from beef, pastrami started as a means of making meat last longer in the days before refrigeration became commonplace. To make pastrami, raw meat is placed in a salty brine and then partly dried before the intense flavor is added using various seasonings, such as mustard, black pepper, coriander, garlic, onion and more. The meat is then smoked and cured before it eventually lands on plates served in front of hungry, but ultimately very happy, customers.
Pastrami shot to fame across the world in the late 1800s as a result of migration. And this sandwich is now a staple ingredient on the menus of trendy cafes, traditional sandwich shops, delicatessens and street food stalls.
The first hot pastrami sandwich of note is believed to have been produced by kosher butcher, Sussman Volk, in 1887. Though Volk was a Lithuanian immigrant who ran his own deli, he had received the recipe from a Romanian friend. The story goes that pastrami became very popular, and it was Volk who then began serving it on rye bread, making the beginnings of the sandwich that it has become today.
The classic hot pastrami sandwich features slices of meat, freshly cut bread (usually rye), mustard, and pickles. Over the years, many have attempted their own versions, adding and subtracting ingredients to add flavor or a dash of creativity. Pastrami features in several dishes, but the traditional hot pastrami sandwich is by far its most high-profile use.
It’s no secret that the hot pastrami sandwich has something of a cult following (just ask Joey Tribbiani, the sandwich-loving character in the hit show Friends), so it’s no wonder that hundreds of foodies look forward to the arrival of National Hot Pastrami Sandwich Day!
How to Celebrate National Hot Pastrami Sandwich Day
There’s no better way to celebrate National Hot Pastrami Sandwich Day than enjoying your own sumptuous sandwich of pastrami on rye. Try out these other ideas for celebrating the day:
Host a Hot Pastrami Sandwich Party
Recreate the recipe and host a party at home for friends and fellow pastrami aficionados. Put out a sandwich bar (filled with rye bread, pastrami, and toppings) and then guests can build their own to just their preferred specifications. Put a little toaster oven at the end of the line for everyone to be able to heat up their sandwiches. Or, for those who don’t feel like making food, feel free to cater it in through a local deli!
Enjoy Pastrami Sandwiches with Coworkers
Order in to the office for an interesting take on a working lunch. Or book a table at one of the leading pastrami sandwich shops in the local area and let an expert do the cooking for you and a group of colleagues.
Learn Fun Facts About Pastrami
Impress folks with interesting bits of trivia and fun facts about the featured meat in the Hot Pastrami Sandwich. Get started with these bits of information that can be shared and passed on for the day:
The oldest surviving New York deli is Katz’s Delicatessen, which has operated continuously since its founding in 1888. They are famous for their Stuffed Pastrami Sandwich–and for the fact that Meg Ryan and Billy Crystal filmed a scene there in the 1989 movie, When Harry Met Sally. Crystal was said to have been munching on a pastrami sandwich while the famous scene was being filmed.
Two different songs about pastrami were recorded in the 1960s. Hot Pastrami (1962) by The Dartells, and Hot Pastrami with Mashed Potatoes (1963) by Joey Dee and the Starlighters.
The Travel Channel’s Food Wars show dedicated an entire episode to this sandwich, all about the New York Pastrami Wars.
The world pastrami eating record is held by American Joey Chestnut, who won by eating 25 pastrami sandwiches (7 ounces each) in the span of 10 minutes.
Visit the Annual Pastrami Festival
Held each year in Warsaw, Poland, this festival features pastrami served in a variety of ways, whether traditional or unconventional. Make plans to visit this capital and largest city in Poland, and get some authentically created pastrami dishes from this region of eastern Europe where it all began.
Whatever the day involves, make sure this much-loved meat product is the star of the show. Pastrami is a well-known crowd-pleaser with a global following, so why not reach out to the wider community of fans and share photos, recipes and recommendations via social media and forums?
Source
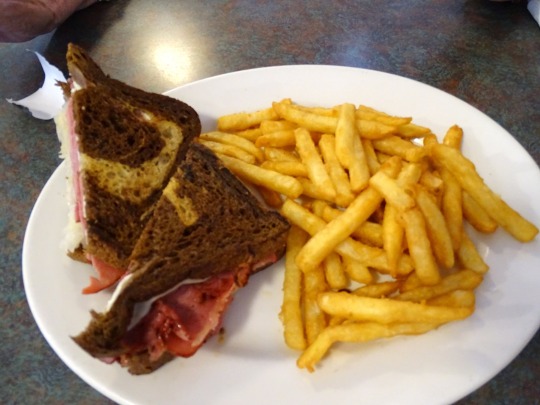
#National Hot Pastrami Sandwich Day#NationalHotPastramiSandwichDay#USA#14 January#Katz’s Delicatessen#New York City#Montréal#Québec#travel#Medium Montreal Smoked Meat#food#fries#pickle#restaurant#vacation#original photography#Los Angeles#Dunn's Famous#Farmer's Market#Canada#California#Reuben Sandwich#not really Hot Pastrami Sandwiches but close enough
2 notes
·
View notes
Text
For the first five years of my life, we lived in the apartment next door to my grandparents. I may have only been a toddler, but I still have vivid memories of being in that home with its many house plants overflowing in their pots, tchotchkes and art from the former Soviet Union, menorahs and other Jewish objects on display, and a welcoming coziness and warmth.
What I remember most about being at my grandparents’ home was the food. Often, there was a pot of something simmering on the stove. On the best days, that pot was filled with tefteli, otherwise known as Russian meatballs. I can still see myself sitting at my grandmother’s table in front of a steaming bowl of tefteli, eagerly waiting for them to cool down so I could start eating.
What makes Russian meatballs different from other kinds? While tefteli come in all types of variations and preparations depending on your own family’s tradition, one of their defining features is that they’re typically made with rice. It’s likely that rice was first incorporated into the dish as a means to stretch the meat, but it also adds a great texture and flavor. Unlike the Italian kind, most Russian meatballs don’t use breadcrumbs, or much by way of herbs or spice. Some folks make them with beef, some with chicken or turkey. The non-kosher versions are often made with pork, and are cooked in a creamy tomato sauce. Some cooks dust the meatballs in flour and then brown them before adding them to the sauce. Some bake them in the oven. Some make a sauce that ends up so thick it is almost shakshuka-like. Usually, shredded carrot is added to the base of the tomato sauce, adding sweetness.
Tefteli are also meant to be eaten on their own as a main course, and they are frequently served with creamy mashed potatoes, but I also love them with a side of polenta, or even with just a slice of good crusty bread.
Every time I make tefteli I try to replicate what my grandmother made for me. Yes, I’m biased, but her meatballs are the best I’ve ever tried. This recipe is fairly simple in terms of its ingredients and steps, but the key to her tefteli’s success is one step that you can’t rush or skip: caramelizing the onions. Caramelizing onions was my grandmother’s go-to flavor builder. When onions get golden and jammy from cooking slowly in a little fat, they add sweetness and umami to any dish. The rest of this recipe mainly involves adding things to a large pot. Leftover rice is great for the meatball mixture, but if you don’t have some on hand, I find the timing works out well if you cook the rice while you’re caramelizing the onions and making the sauce. I prefer to use dark meat ground chicken for this, but you can definitely make this with turkey or beef.
This is the kind of dish that rarely gets a written recipe. I’ve given you specifics, but deviating from what is suggested will only make this better. Taste and modify your tefteli and sauce to your own liking. For instance, my mom actually dislikes rice in her meatballs, so she adds breadcrumbs or matzah meal instead. I like to add chili flake for subtle heat, but that can be completely omitted. I find that these are perfect when they’re on the larger-side, but if you like smaller-sized meatballs go for that. In any form, these are best made in a big batch so that they can be shared with loved ones, and so that they can fill your home with warmth and the smell of good simple food.
I suggest serving these meatballs with a generous ladle of sauce, topped with chopped fresh parsley alongside mashed potatoes, your favorite side, or slices of good bread.
Note:Meatballs can be made several days in advance, and they freeze and reheat well.
5 notes
·
View notes
Text
Honestly, a lot of people constantly make the mistake that ancient people were stupid and believed in stupid things. But the simple fact is that every single ancient belief and religion stemmed from real, practical decisions, whether to avoid eating possibly-toxic food (Kosher and Halal diets), to make sure they don't destroy the environment (animism), etc.
Sacrificing an animal to cut down a tree doesn't just mean that you're actually thinking hard on whether or not you need to, it also means you're fertilizing the soil for future trees. When ancient peoples decided to give up some of their food to try and make the trees less mad when they cut one down, it made new trees grow healthier and faster. When you sacrifice some of your fish catch to the ocean as thanks, it encourages larger fish to stay near the surface. Ancient people knew exactly what they were doing, they just couldn't know why it worked. They didn't have any way to know what microbes were, or to know how fish reproduced, or the exact science behind biology, they just knew when something worked and when it didn't. And when something worked, they tried to come up with reasons why it worked, not only to better understand it, but also so that it's easier to pass on to their descendants.
Ultimately, giving a prayer and a small sacrifice to each tree you cut down is, quite literally, the exact same thing as thinking over whether or not you need to cut it down and fertilizing the soil after you do.
Was reading on wikipedia about how lots of ancient cultures had beliefs and traditions where you had to offer prayers and/or sacrifices if you wanted to cut down a tree because you were basically killing the spirit that lived within the tree and if you did that without good reason bad stuff would happen to you
we should bring that back. if you want to clear cut a forest you have to pray and sacrifice on behalf of every single tree
29K notes
·
View notes
Text
So I like to write and I like to cook so let's combine the two and talk food symbolism.
Most obviously and bluntly, Reece keeps kosher. He has an iron clad moral compass and a rigid diet and severy time he's tempted to break the former he is tempted with the latter. He is a very simple character by design.
Next up, Isabella. She is ladylike and likes the kinda posh foods you don't get many places. This is someone who will hold up the plot for some Escargot. But she also really likes the idea of spice. As in, hot food. Which is funny because she has my spice tolerance. That being absolute zero. So, yeah, someone who likes the idea of being a detective who struggles with the substance of it (helping people) has that reflected in what she eats.
Stones meanwhile does not care, he just devours. It is a bit that he is constantly starving, and isn't picky about what for. Pyromancer, fire consumes, you get the idea.
Then there is Barley, who is very picky. Barley doesn't eat anything unless they know what's in it, and even then, it's iffy. For example, they don't trust soup. This is reflective of trust issues, but it mainly plays into the fact that Isabella doesn't know, despite the fact they live together. One of the first scenes in the second arc is Isabella trying to give back to Barley by cooking for them, and Barley eats one part of it.
To contrast this, Northumbria eats like a normal human being, but knows London better than anyone and can offer a guided tour of the food in the city. She frames a lot of the other conversation, including when she asks Stones what he wants to eat and he can't answer. He says "anything" and she makes a joke about that not being on the menu, then immediately clocks how bad he is at making decisions. She is the Mum friend.
Finally, Payton doesn't eat. She doesn't get hungry, she apparently doesn't need to drink either. Which is weird.
#presbyopia#presbyopia series#oc#eli stones#barley the unchained#presbysnippets#ocs#isabella tylluan#reece corryn#northumbria merino#payton o royal
1 note
·
View note
Photo
We all want to eat a balanced diet without feeling like we’re missing out on favorite foods. But who says you can’t do both? All it takes is a few simple swaps in homemade classics to lighten them up and not skimp on flavor. Top nutrition expert Joy Bauer, MS, RDN, CDN, swears by this as her recent partnership with Home Instead (an in-home senior care services company) provided the opportunity to showcase her favorite recipes that are not only flavorful but help promote longevity. These recipes will become instant staples in your household as they’re healthier versions of beloved dishes, such as pasta alla vodka and chocolate fudge cakes. “A lot of people think that it’s too late to change your ways and start eating healthy, and that’s simply not true,” Bauer says. Keep scrolling for her comforting and nourishing recipes the whole family will devour! Weight Loss Joy Bauer’s Best Health Tips: The Best Food Change for Weight Loss Joy Bauer, one of the country’s top nutrition experts, has a passion for making healthy eating enjoyable and accessible. As a regular contributor to FIRST for Women, Joy shares her wealth of knowledge on how to use simple, delicious foods to improve overall health and vitality. Known for her approachable, friendly style, Joy has a […] Bauer’s approach to fuss-free cooking at home Whipping up yummy, nutritious meals doesn’t have to be a chore. In fact, Bauer shares her top three shortcuts that make prep a breeze and produce a delicious dish every time. 1. Opt for prepared ingredients to save time. Finding ingredients that are already prepped allows you to put together meals faster. “Try things like buying rotisserie chicken at the market or you can buy pre-chopped vegetables and fruits that are already washed and ready to eat,” she says. You may pay a little extra for these ingredients but it’s worth it for speedy and scrumptious results. 2. Utilize convenient gadgets and appliances. Bauer says she loves “ all the gadgets that make healthy eating more accessible and approachable and less fussy.” Some of her favorites include the slow cooker and air fryer as they’re versatile for sweet or savory dishes. Also, sheet pans because it’s easy to bake meat, veggies and other ingredients on a single tray to create a whole meal. 3. Make a dish once and eat it multiple times. Meal prepping is the ultimate way to have prepared dishes stashed away so they can be reheated when you’re ready to enjoy them. “Make a recipe that yields four to six servings, and then freeze the extras in individual or couple-sized portions,” she explains. “The idea is to create a healthy takeout kitchen in your freezer so that you put in the effort once, but then the payback is ginormous.” Food Joy Bauer's Top 5 Strategies to Boost the Nutrition of Your Grocery Cart The way you shop while at the grocery store sets you up for healthy, happy eating, says TODAY nutritionist and FIRST contributor Joy Bauer, M.S., RDN. We all know that the supermarket can be an overwhelming place, and it is incredibly easy to get sidetracked by the plethora of delicious options. But, those tasty treats […] Bauer’s 3 delicious recipes that help promote longevity Here, you’ll find three satisfying recipes from Bauer that provide a boost of vitamins, minerals and nutrients that your body will thank you for later! (Bonus: Check out Home Instead’s blog for more healthy aging recipe insights.) 1. Penne Alla Hummus Joybauer.com Creamy, dreamy, quick and easy—this pasta dish delivers all the comfort food feels with a surprising twist: hummus! Ingredients: 2 tbsp extra-virgin olive oil 2 pints grape or cherry tomatoes, (4 cups total) 4 cloves garlic, peeled and minced 1 medium red bell pepper, diced into ½ to 1-inch pieces 1 tbsp Italian seasollie 1 tsp kosher salt 8 to 10 ounces roasted pepper hummus, (1¼ cups) ½ tsp crushed red pepper flakes, optional 1 (14 oz) box penne, cooked and drained Fresh basil, thinly sliced, for optional garnish Directions: Active: 5 mins Total time: 40 mins Yield: 6 servings Heat oven to 375°F. Drizzle the olive oil along the bottom of a 9-by-13-inch (3 quart) oven-proof casserole pan. Add tomatoes, garlic, bell pepper, Italian seasoning and salt, and mix until everything is well combined. Make a small well in the center and add roasted red pepper hummus. Cook for 30 to 35 minutes or until tomatoes start to burst and peppers start to caramelize. Meanwhile, prepare pasta according to the package directions. Reserve ⅔ cup of starchy pasta water (this is in case you’d like to add some to your final sauce for a moister consistency). Drain pasta and set aside. Remove pan from oven when done cooking, and using the back of a wooden spoon, smash tomatoes, garlic, and peppers, incorporating them into the hummus to create a creamy sauce. Add the cooked pasta in small batches, and mix until well coated (you wil not need the entire box of pasta; I typically use only ¾ of the box for a saucier finish) adding a splash of cooking liquid if needed for extra moisture. Garnish with fresh basil, crushed red pepper flakes for heat, and optional cheese, if desired. Serve immediately. 2. Sheet Pan Chicken and Veggies Joybauer.com This easy sheet pan supper is a weeknight win—everything cooks on one pan, which means less mess, less stress and more flavor! Ingredients: For the veggies: 4 to 5 cups broccoli florets, break larger ones into bite- sized pieces 1 (12 oz) bag green beans ½ tsp kosher salt ½ tsp ground black pepper Olive oil spray For the marinade & chicken: ¼ cup olive oil or avocado oil 3 tbsp lemon juice 1 tbsp Italian seasoning 4 to 5 garlic cloves, minced (or 2 to 3 tsp garlic powder) 1 tsp kosher salt 1 tsp ground black pepper 4 boneless, skinless medium chicken breasts, (6 oz each) Directions: Active: 10 mins Total time: 40 mins Yield: 4 servings Preheat your oven to 400°F and mist a large baking sheet with nonstick spray. Spread broccoli and green beans in a single layer on the sheet. Mist the veggies with olive oil spray, then sprinkle with ½ tsp salt and ½ tsp black pepper. Roast ni the oven for 15 minutes. Make the marinade and prep the chicken: While the veggies are roasting, whisk together the olive oil, lemon juice, Italian seasoning, garlic, 1 tsp salt and 1 tsp black pepper in a bowl. Add the chicken breasts, tossing to coat. Let them marinate while the veggies finish roasting. After 15 minutes, remove the veggies from the oven. Push the veggies to the sides of the pan, clearing 4 spaces for the chicken. Lay the chicken breasts directly onto the hot pan to get a nice sear. Pour any extra marinade evenly over the chicken pieces. Return the pan to the oven and bake for another 15 minutes, or until the chicken reaches an internal temperature of 165°F at its thickest part. Remove from oven and garnish with optional fresh herbs (like parsley or basil). 3. Two-Ingredient Chocolate Fudge Cakes Joybauer.com I’m excited to share this delicious and fuss-free recipe for 2-Ingredient Chocolate Fudge Cakes. Ingredients: 2¼ cups semi-sweet chocolate chips, melted 1 cup pumpkin puree Directions: Active: 5 mins Total time: 2 hrs, 5 mins Yield: 10 servings Prepare a standard muffin tin: add paper liners to 10 (of the 12 muffin) compartments I( like to double up on the paper liners for extra sturdiness. No need to mist with oil spray). Set aside. Melt the chocolate chips using a double boiler or using the microwave method (see recipe notes below). Mix in the pumpkin puree and stir until the mixture is smooth and creamy without any streaks of pumpkin. Divide the batter among the 10 paper liners, smooth the tops using the back of a spoon and give the muffin tin a few taps on the counter to flatten out the cakes. Place in fridge to firm for 2 hours or more. Serve with optional berries and dark chocolate shavings. Read on for more tasty and healthy recipes: Try This Cottage Cheese Chicken Salad Recipe for a Light, Protein-Rich Twist on the Classic Try the Healthy Goddess Orzo Salad from Danielle Brown’s Cookbook ‘Life Changing Salads’ Citrus Salad Is a Feel Good Dish That Preps in 10 Minutes: Try These 2 Sweet and Fruity Recipes Source link
0 notes
Photo

We all want to eat a balanced diet without feeling like we’re missing out on favorite foods. But who says you can’t do both? All it takes is a few simple swaps in homemade classics to lighten them up and not skimp on flavor. Top nutrition expert Joy Bauer, MS, RDN, CDN, swears by this as her recent partnership with Home Instead (an in-home senior care services company) provided the opportunity to showcase her favorite recipes that are not only flavorful but help promote longevity. These recipes will become instant staples in your household as they’re healthier versions of beloved dishes, such as pasta alla vodka and chocolate fudge cakes. “A lot of people think that it’s too late to change your ways and start eating healthy, and that’s simply not true,” Bauer says. Keep scrolling for her comforting and nourishing recipes the whole family will devour! Weight Loss Joy Bauer’s Best Health Tips: The Best Food Change for Weight Loss Joy Bauer, one of the country’s top nutrition experts, has a passion for making healthy eating enjoyable and accessible. As a regular contributor to FIRST for Women, Joy shares her wealth of knowledge on how to use simple, delicious foods to improve overall health and vitality. Known for her approachable, friendly style, Joy has a […] Bauer’s approach to fuss-free cooking at home Whipping up yummy, nutritious meals doesn’t have to be a chore. In fact, Bauer shares her top three shortcuts that make prep a breeze and produce a delicious dish every time. 1. Opt for prepared ingredients to save time. Finding ingredients that are already prepped allows you to put together meals faster. “Try things like buying rotisserie chicken at the market or you can buy pre-chopped vegetables and fruits that are already washed and ready to eat,” she says. You may pay a little extra for these ingredients but it’s worth it for speedy and scrumptious results. 2. Utilize convenient gadgets and appliances. Bauer says she loves “ all the gadgets that make healthy eating more accessible and approachable and less fussy.” Some of her favorites include the slow cooker and air fryer as they’re versatile for sweet or savory dishes. Also, sheet pans because it’s easy to bake meat, veggies and other ingredients on a single tray to create a whole meal. 3. Make a dish once and eat it multiple times. Meal prepping is the ultimate way to have prepared dishes stashed away so they can be reheated when you’re ready to enjoy them. “Make a recipe that yields four to six servings, and then freeze the extras in individual or couple-sized portions,” she explains. “The idea is to create a healthy takeout kitchen in your freezer so that you put in the effort once, but then the payback is ginormous.” Food Joy Bauer's Top 5 Strategies to Boost the Nutrition of Your Grocery Cart The way you shop while at the grocery store sets you up for healthy, happy eating, says TODAY nutritionist and FIRST contributor Joy Bauer, M.S., RDN. We all know that the supermarket can be an overwhelming place, and it is incredibly easy to get sidetracked by the plethora of delicious options. But, those tasty treats […] Bauer’s 3 delicious recipes that help promote longevity Here, you’ll find three satisfying recipes from Bauer that provide a boost of vitamins, minerals and nutrients that your body will thank you for later! (Bonus: Check out Home Instead’s blog for more healthy aging recipe insights.) 1. Penne Alla Hummus Joybauer.com Creamy, dreamy, quick and easy—this pasta dish delivers all the comfort food feels with a surprising twist: hummus! Ingredients: 2 tbsp extra-virgin olive oil 2 pints grape or cherry tomatoes, (4 cups total) 4 cloves garlic, peeled and minced 1 medium red bell pepper, diced into ½ to 1-inch pieces 1 tbsp Italian seasollie 1 tsp kosher salt 8 to 10 ounces roasted pepper hummus, (1¼ cups) ½ tsp crushed red pepper flakes, optional 1 (14 oz) box penne, cooked and drained Fresh basil, thinly sliced, for optional garnish Directions: Active: 5 mins Total time: 40 mins Yield: 6 servings Heat oven to 375°F. Drizzle the olive oil along the bottom of a 9-by-13-inch (3 quart) oven-proof casserole pan. Add tomatoes, garlic, bell pepper, Italian seasoning and salt, and mix until everything is well combined. Make a small well in the center and add roasted red pepper hummus. Cook for 30 to 35 minutes or until tomatoes start to burst and peppers start to caramelize. Meanwhile, prepare pasta according to the package directions. Reserve ⅔ cup of starchy pasta water (this is in case you’d like to add some to your final sauce for a moister consistency). Drain pasta and set aside. Remove pan from oven when done cooking, and using the back of a wooden spoon, smash tomatoes, garlic, and peppers, incorporating them into the hummus to create a creamy sauce. Add the cooked pasta in small batches, and mix until well coated (you wil not need the entire box of pasta; I typically use only ¾ of the box for a saucier finish) adding a splash of cooking liquid if needed for extra moisture. Garnish with fresh basil, crushed red pepper flakes for heat, and optional cheese, if desired. Serve immediately. 2. Sheet Pan Chicken and Veggies Joybauer.com This easy sheet pan supper is a weeknight win—everything cooks on one pan, which means less mess, less stress and more flavor! Ingredients: For the veggies: 4 to 5 cups broccoli florets, break larger ones into bite- sized pieces 1 (12 oz) bag green beans ½ tsp kosher salt ½ tsp ground black pepper Olive oil spray For the marinade & chicken: ¼ cup olive oil or avocado oil 3 tbsp lemon juice 1 tbsp Italian seasoning 4 to 5 garlic cloves, minced (or 2 to 3 tsp garlic powder) 1 tsp kosher salt 1 tsp ground black pepper 4 boneless, skinless medium chicken breasts, (6 oz each) Directions: Active: 10 mins Total time: 40 mins Yield: 4 servings Preheat your oven to 400°F and mist a large baking sheet with nonstick spray. Spread broccoli and green beans in a single layer on the sheet. Mist the veggies with olive oil spray, then sprinkle with ½ tsp salt and ½ tsp black pepper. Roast ni the oven for 15 minutes. Make the marinade and prep the chicken: While the veggies are roasting, whisk together the olive oil, lemon juice, Italian seasoning, garlic, 1 tsp salt and 1 tsp black pepper in a bowl. Add the chicken breasts, tossing to coat. Let them marinate while the veggies finish roasting. After 15 minutes, remove the veggies from the oven. Push the veggies to the sides of the pan, clearing 4 spaces for the chicken. Lay the chicken breasts directly onto the hot pan to get a nice sear. Pour any extra marinade evenly over the chicken pieces. Return the pan to the oven and bake for another 15 minutes, or until the chicken reaches an internal temperature of 165°F at its thickest part. Remove from oven and garnish with optional fresh herbs (like parsley or basil). 3. Two-Ingredient Chocolate Fudge Cakes Joybauer.com I’m excited to share this delicious and fuss-free recipe for 2-Ingredient Chocolate Fudge Cakes. Ingredients: 2¼ cups semi-sweet chocolate chips, melted 1 cup pumpkin puree Directions: Active: 5 mins Total time: 2 hrs, 5 mins Yield: 10 servings Prepare a standard muffin tin: add paper liners to 10 (of the 12 muffin) compartments I( like to double up on the paper liners for extra sturdiness. No need to mist with oil spray). Set aside. Melt the chocolate chips using a double boiler or using the microwave method (see recipe notes below). Mix in the pumpkin puree and stir until the mixture is smooth and creamy without any streaks of pumpkin. Divide the batter among the 10 paper liners, smooth the tops using the back of a spoon and give the muffin tin a few taps on the counter to flatten out the cakes. Place in fridge to firm for 2 hours or more. Serve with optional berries and dark chocolate shavings. Read on for more tasty and healthy recipes: Try This Cottage Cheese Chicken Salad Recipe for a Light, Protein-Rich Twist on the Classic Try the Healthy Goddess Orzo Salad from Danielle Brown’s Cookbook ‘Life Changing Salads’ Citrus Salad Is a Feel Good Dish That Preps in 10 Minutes: Try These 2 Sweet and Fruity Recipes Source link
0 notes
Text
The Power of Simple Pantry Staples: Crushed Red Pepper Flakes, Prepared Mustard, and Kosher Salt
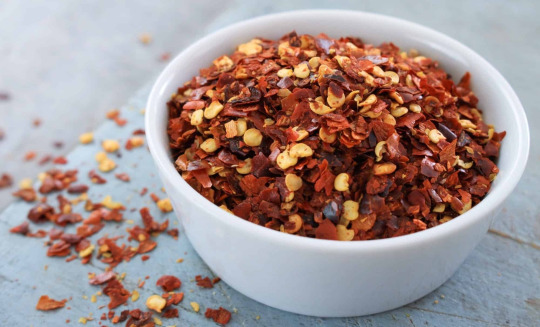
When it comes to cooking, the simplest ingredients often have the most profound impact on flavor. Three such pantry staples that bring bold, tangy, and spicy notes to any dish are crushed red pepper flakes, prepared mustard, and kosher salt. These ingredients are versatile and can elevate everything from snacks to hearty meals with ease. Let’s explore each one and how they can enhance your culinary creations.
Crushed Red Pepper Flakes: A Touch of Spice
Crushed red pepper flakes, made from dried chili peppers, are a popular ingredient for adding heat and depth to dishes. The versatility of red pepper flakes lies in their ability to enhance both savory and sweet recipes. When you sprinkle them over pizza, pasta, or soups, they instantly provide a sharp, spicy kick. They can also serve as the perfect complement to vegetables, meats, and even certain types of cheese.
The heat from red pepper flakes can vary depending on the type of chili used, so it’s essential to add them gradually. A little goes a long way, so starting with a small amount and tasting as you go will help you find the right level of heat. Aside from heat, crushed red pepper flakes also introduce a hint of smokiness, which can deepen the flavor profile of your dishes.
In addition to savory applications, crushed red pepper flakes can be used in sweet dishes, too. Try sprinkling them over chocolate for a spicy twist or adding them to fruit salsas for a unique fusion of flavors. They can also be mixed into homemade salad dressings, giving your vinaigrette an exciting kick.
Prepared Mustard: Tangy and Versatile
Prepared mustard is another essential ingredient that can transform dishes with its sharp, tangy flavor. With a smooth texture and a mild spice, prepared mustard is a go-to condiment for sandwiches, burgers, and hot dogs. However, its uses extend far beyond just a topping.
Prepared mustard, whether yellow, Dijon, or spicy brown, is a key ingredient in many salad dressings and marinades. It serves as a fantastic emulsifier, helping to bind oils and vinegar together for a smooth consistency. Its tangy taste helps cut through the richness of heavy dishes, making it a perfect companion for roasted meats, grilled vegetables, and fried foods.
If you’re feeling creative, you can even make mustard-based sauces to pair with seafood or poultry. Mixing prepared mustard with honey or brown sugar can create a sweet and tangy glaze that adds depth to roasted meats or acts as a dipping sauce for appetizers.
Kosher Salt: The Unsung Hero of Flavor
Kosher salt is a staple in many kitchens, and for good reason. Its larger grain size compared to regular table salt makes it easy to control, especially when seasoning meat or vegetables. Kosher salt’s mild flavor means it can be sprinkled generously without overwhelming a dish, making it ideal for enhancing the natural flavors of ingredients.
Beyond its seasoning capabilities, kosher salt is often used in brining, as its larger crystals are better at drawing out moisture. Whether you’re curing meats or making a homemade pickle brine, kosher salt plays a crucial role in creating tender and flavorful results. It’s also a common ingredient in baking, as it helps to balance the sweetness of desserts and enhances the overall flavor of bread and pastries.
The Trio in Action
When combined, crushed red pepper flakes, prepared mustard, and kosher salt can create a simple yet flavorful seasoning blend. For example, mixing mustard with kosher salt and crushed red pepper flakes can create a zesty rub for meats before grilling or roasting. This trio can also be sprinkled over roasted vegetables or mixed into pasta dishes for a bold, spicy kick.
Each of these ingredients is inexpensive and easy to find, yet they can bring a world of flavor to your kitchen. So next time you're in need of a quick flavor boost, reach for these pantry staples and see how they can transform your meals into something extraordinary.
0 notes
Text


National Hot Pastrami Sandwich Day
There are few things that are more alluring for food lovers than the smell of a hot pastrami sandwich that is winging its way across a restaurant. For those that salivate at the thought, celebrating National Hot Pastrami Sandwich Day is a must.
National Hot Pastrami Sandwich Day is a celebration of the mouthwatering, edible treat that is the much-loved hot pastrami sandwich. A shining example of culinary beauty, this delicious delicacy is created using thin slices of piping hot pastrami that are served on rye bread, usually topped with melted Swiss cheese slices, a helping of Russian dressing, and a pickle on the side.
What some people might consider to be just a sandwich, other folks recognize this sandwich as the perfect (and only) reason to celebrate on this day. Get ready to enjoy National Hot Pastrami Sandwich Day!
History of National Hot Pastrami Sandwich Day
A staple must-try dish for those visiting the iconic American city of New York (where the sandwich originated), the hot pastrami sandwich has a rich history, and it has inspired many a chef to experiment with its treasured ingredients. It’s rare for a simple snack to bear such significance and carry such gravitas in the gastronomic world, and this is why National Hot Pastrami Sandwich Day came into being.
Pastrami is a very popular meat product, one that seems to have originated in the Jewish communities of Romania. Pastrami comes from the Romanian word ‘pastrama,’ which is a derivative of the word ‘pastra,’ a word indicating that a food has been conserved or preserved.
Usually made from beef, pastrami started as a means of making meat last longer in the days before refrigeration became commonplace. To make pastrami, raw meat is placed in a salty brine and then partly dried before the intense flavor is added using various seasonings, such as mustard, black pepper, coriander, garlic, onion and more. The meat is then smoked and cured before it eventually lands on plates served in front of hungry, but ultimately very happy, customers.
Pastrami shot to fame across the world in the late 1800s as a result of migration. And this sandwich is now a staple ingredient on the menus of trendy cafes, traditional sandwich shops, delicatessens and street food stalls.
The first hot pastrami sandwich of note is believed to have been produced by kosher butcher, Sussman Volk, in 1887. Though Volk was a Lithuanian immigrant who ran his own deli, he had received the recipe from a Romanian friend. The story goes that pastrami became very popular, and it was Volk who then began serving it on rye bread, making the beginnings of the sandwich that it has become today.
The classic hot pastrami sandwich features slices of meat, freshly cut bread (usually rye), mustard, and pickles. Over the years, many have attempted their own versions, adding and subtracting ingredients to add flavor or a dash of creativity. Pastrami features in several dishes, but the traditional hot pastrami sandwich is by far its most high-profile use.
It’s no secret that the hot pastrami sandwich has something of a cult following (just ask Joey Tribbiani, the sandwich-loving character in the hit show Friends), so it’s no wonder that hundreds of foodies look forward to the arrival of National Hot Pastrami Sandwich Day!
How to Celebrate National Hot Pastrami Sandwich Day
There’s no better way to celebrate National Hot Pastrami Sandwich Day than enjoying your own sumptuous sandwich of pastrami on rye. Try out these other ideas for celebrating the day:
Host a Hot Pastrami Sandwich Party
Recreate the recipe and host a party at home for friends and fellow pastrami aficionados. Put out a sandwich bar (filled with rye bread, pastrami, and toppings) and then guests can build their own to just their preferred specifications. Put a little toaster oven at the end of the line for everyone to be able to heat up their sandwiches. Or, for those who don’t feel like making food, feel free to cater it in through a local deli!
Enjoy Pastrami Sandwiches with Coworkers
Order in to the office for an interesting take on a working lunch. Or book a table at one of the leading pastrami sandwich shops in the local area and let an expert do the cooking for you and a group of colleagues.
Learn Fun Facts About Pastrami
Impress folks with interesting bits of trivia and fun facts about the featured meat in the Hot Pastrami Sandwich. Get started with these bits of information that can be shared and passed on for the day:
The oldest surviving New York deli is Katz’s Delicatessen, which has operated continuously since its founding in 1888. They are famous for their Stuffed Pastrami Sandwich–and for the fact that Meg Ryan and Billy Crystal filmed a scene there in the 1989 movie, When Harry Met Sally. Crystal was said to have been munching on a pastrami sandwich while the famous scene was being filmed.
Two different songs about pastrami were recorded in the 1960s. Hot Pastrami (1962) by The Dartells, and Hot Pastrami with Mashed Potatoes (1963) by Joey Dee and the Starlighters.
The Travel Channel’s Food Wars show dedicated an entire episode to this sandwich, all about the New York Pastrami Wars.
The world pastrami eating record is held by American Joey Chestnut, who won by eating 25 pastrami sandwiches (7 ounces each) in the span of 10 minutes.
Visit the Annual Pastrami Festival
Held each year in Warsaw, Poland, this festival features pastrami served in a variety of ways, whether traditional or unconventional. Make plans to visit this capital and largest city in Poland, and get some authentically created pastrami dishes from this region of eastern Europe where it all began.
Whatever the day involves, make sure this much-loved meat product is the star of the show. Pastrami is a well-known crowd-pleaser with a global following, so why not reach out to the wider community of fans and share photos, recipes and recommendations via social media and forums?
Source
#National Hot Pastrami Sandwich Day#NationalHotPastramiSandwichDay#USA#14 January#Katz’s Delicatessen#New York City#Montréal#Québec#travel#Medium Montreal Smoked Meat#food#fries#pickle#restaurant#vacation#original photography#Los Angeles#Dunn's Famous#Farmer's Market#Canada#California#Reuben Sandwich#not really Hot Pastrami Sandwiches but close enough
4 notes
·
View notes
Text
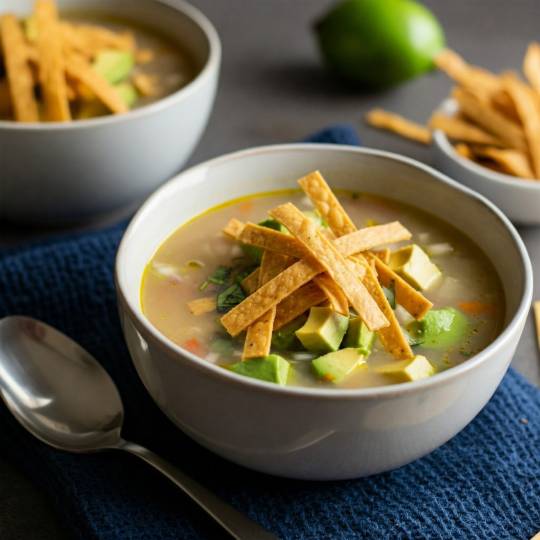
Sopa de Lima Ditch the ordinary and dive into a bowl of sunshine with Sopa de Lima! This isn't your average chicken soup; it's a fiesta of flavors dancing in your mouth. Imagine: a tangy lime symphony with a hint of spice, tender chicken, and the crunch of tortilla strips. It's like a vacation for your taste buds, transporting you to the vibrant streets of Mexico with every spoonful. Here's why this recipe is a must-try: Flavor Fusion: Pucker up for the perfect balance of zesty lime and savory chicken, with a whisper of warmth from cinnamon and cloves. It's a flavor combination that will have you saying "olé!" Comfort Food with a Kick: Sopa de Lima is like a warm hug on a chilly day, but with an exciting twist. It's comfort food that's anything but boring. Easy Does It: Don't let the exotic flavors intimidate you. This recipe is surprisingly simple to make, even for beginner cooks. You'll be a sopa superstar in no time! Healthy and Delicious: This soup is packed with lean protein, fresh veggies, and a vibrant broth. It's a feel-good meal that nourishes your body and soul. Crowd-Pleaser: Whether you're hosting a fiesta or just want a cozy night in, Sopa de Lima is a guaranteed crowd-pleaser. Everyone will be asking for seconds! So, what are you waiting for? Grab your ingredients, put on some mariachi music, and get ready to experience the magic of Sopa de Lima! Sopa de Lima No ratings yet Course: Soup, StarterCuisine: MexicanKeyword: Lime, Mexican, Soup, Yucatan Peninsula Prep Time: 10 minutes minutesCook Time: 45 minutes minutes Servings: 6 people Calories: 139kcal Sopa de lima is a traditional Mexican soup that originates from the Yucatán Peninsula. It's known for its refreshing and zesty flavor, thanks to the prominent use of lime juice. The soup typically features a light chicken or turkey broth, shredded meat (often turkey), and a blend of vegetables and spices. Print Recipe 1x2x3x Share on Facebook Pin Recipe Cook ModePrevent your screen from going dark Ingredients2 Tbsp Olive Oil 2 Roma Tomatoes 1 Large Yellow Onion fine dice 1 Anahiem Pepper ¼ tsp Ground Cinnamon ⅛ tsp Ground Cloves 2 tsp Kosher Salt 3 Cloves Garlic minced l lbs Chicken Breast boneless & skinless 8 Cups Chicken Broth ½ Cup Lime Juice fresh squeezed 1 Corn Tortillas cut into strips and fry 1 Avocado dicedGet ingredients with InstructionsHeat the olive oil in a large pot or Dutch oven over medium-high heat. Add the chopped tomatoes, onion, and bell peppers. Cook, stirring occasionally, until the vegetables are softened and slightly caramelized. Add the ground cinnamon, cloves, and kosher salt to the pot. Stir well to incorporate the spices into the vegetables. Continue cooking for another 5 minutes, allowing the flavors to meld. Stir in the minced garlic and cook until it becomes aromatic and softens slightly, about 1 minute. Pour the chicken broth into the pot, then add the chicken breasts. Bring the mixture to a boil over high heat. Once boiling, reduce the heat to low, cover the pot, and simmer for 20 minutes. Remove the pot from the heat. Remove any foam or impurities from the surface of the soup. Shred the cooked chicken with two forks and set it aside. Add the shredded chicken back to the pot. Stir in the lime juice. Taste the soup and add more salt if needed. Now, ladle the steaming soup into bowls and finish with a sprinkle of crispy tortilla strips and some creamy diced avocado. Enjoy! NotesIngredients: Broth: While chicken broth is most common, you can use turkey broth for a more traditional Yucatecan flavor. Homemade broth will add the most depth. Meat: Shredded chicken is widely used, but turkey is more traditional in the Yucatán. You can use leftover cooked poultry or poach chicken breasts specifically for the soup. Vegetables: The classic base includes tomatoes, onions, and bell peppers. Some recipes also add carrots or jalapeños for a bit of heat. Spices: Oregano is essential. Cumin, cloves, and cinnamon are also common additions. Lime Juice: Freshly squeezed lime juice is key for the signature tart flavor. Use plenty! Tortilla Strips: These add a wonderful crunch. You can use store-bought or make your own by frying or baking corn tortillas. Avocado: Diced avocado is a popular garnish, adding creaminess and a contrasting flavor. Cooking Tips: Sauté the Vegetables: Don't rush the sautéing of the vegetables. Allow them to soften and develop a bit of sweetness. Bloom the Spices: Cooking the spices briefly in the oil helps to intensify their flavor. Simmer Gently: Simmering the soup allows the flavors to meld and the chicken to become tender. Skim the Broth: Skim off any foam or impurities that rise to the surface of the soup for a clearer broth. Lime Juice at the End: Add most of the lime juice towards the end of cooking to preserve its fresh flavor. Taste and Adjust: Taste the soup before serving and adjust the seasonings (especially salt and lime juice) to your liking. Serving Suggestions: Garnish: Don't forget the tortilla strips and avocado! Cilantro sprigs and lime wedges are also nice additions. Sides: Sopa de lima is often served with warm tortillas or crusty bread for dipping. Pairings: It's a great starter for heavier Mexican dishes like enchiladas, tacos, or mole. Variations: Spicy: Add some diced jalapeños or serrano peppers to the soup for extra heat. Vegetarian: Omit the chicken or turkey and use vegetable broth. You can add more vegetables like zucchini or corn. Hearty: Add cooked rice or noodles to the soup for a more filling meal. With these tips, you'll be able to make a delicious and authentic sopa de lima that captures the essence of Yucatecan cuisine! NutritionServing: 12oz | Calories: 139kcal | Carbohydrates: 10g | Protein: 3g | Fat: 10g | Saturated Fat: 1g | Polyunsaturated Fat: 1g | Monounsaturated Fat: 7g | Cholesterol: 6mg | Sodium: 1961mg | Potassium: 360mg | Fiber: 3g | Sugar: 4g | Vitamin A: 310IU | Vitamin C: 25mg | Calcium: 33mg | Iron: 1mg Related Recipes Beef Stroganoff Tex-Mex Meatball Soup Gallo Pinto Creamy Chicken Soup with Pasta & Spinach Ingredients Ingredients: 2 tablespoons olive oil 1 large yellow onion, finely diced 2 Roma tomatoes, chopped 1 Anaheim pepper, seeded and chopped ¼ teaspoon ground cinnamon ⅛ teaspoon ground cloves 2 teaspoons kosher salt 3 cloves garlic, minced 1 pound boneless, skinless chicken breasts 8 cups chicken broth ½ cup freshly squeezed lime juice For Topping: 1 corn tortilla, cut into strips and fried 1 avocado, diced Image Gallery Sopa de Lima Sopa de Lima Sopa de lima Sopa de Lima Sopa de Lima Sopa de Lima Storage & Leftovers Storing Your Leftover Sopa de Lima: Cool it Down: Before storing, let the soup cool to room temperature. This prevents condensation, which can make the soup watery. The Right Container: Use an airtight container to keep the soup fresh and prevent it from absorbing other flavors in your fridge. Refrigerator Storage: Store leftover sopa de lima in the refrigerator for 3 to 4 days. Freezer-Friendly: You can freeze it for up to 2 months. For best results, freeze the soup without the toppings, as they might not hold up well in the freezer. Reheating Tips: Thaw if Frozen: Thaw the soup in the refrigerator overnight or in a bowl of cold water. Stovetop Reheating: Reheat gently in a saucepan over medium-low heat, stirring occasionally. Microwave Reheating: Heat in short bursts, stirring between each burst, until warmed through. Adjust Consistency: If the soup is too thick after reheating, add a little chicken broth or water to thin it out. Topping Tips: Tortilla Strips: Store leftover tortilla strips separately in an airtight container at room temperature to maintain their crispiness. Avocado: Add fresh avocado when serving the reheated soup, as it tends to brown quickly. Extra Tips for Sopa Savvy: Separate Storage: If possible, store the toppings (tortilla strips and avocado) separately from the soup to prevent them from getting soggy. Flavor Boost: When reheating, add a squeeze of fresh lime juice and a sprinkle of fresh cilantro to brighten the flavors. With these tips, you can enjoy your homemade sopa de lima even days after you've made it! 🍲 Table of Contents - Storage & Leftovers - List of Ingredients - Images - Recipe - Related Recipes Please follow and like us: 19712020 20 0 Comments Submit a Comment Cancel replyYour email address will not be published. Required fields are marked * Recipe Rating Recipe Rating Comment * Name * Email * Website Save my name, email, and website in this browser for the next time I comment. Submit Comment Read the full article
0 notes
Text

Monday 9/16 Eats: French Toast (don't let looks deceive you)
I've had a craving for French Toast for a few months. Yesterday I found a recipe that looked promising, so this morning I schlepped it to the local foods libraries (Kroger) to buy the ingredients I didn't already have. I also bought the stuff to try Jim Lahey's famous No Knead bread recipe, so that'll be a post in the near future:)
Back to the French Toast. I'll link the original recipe in the post for anyone who might happen upon this post. This recipe calls for oven dried bread. I'm only cooking for myself, so I took two slices of brioche and put them on a baking sheet in the oven for about 30 minutes at 200°F, turning them over halfway through. I removed the dried bread from the oven and set it aside to dry in the open air for another 45 minutes while I cleaned my fridge and made inventories for my fridge and cabinets (it helps with the object permanence issues from ADHD).
I was skeptical about drying the bread this much, but the results were incredible. The bread took the milk and egg mixture beautifully. The final result had a nice, caramel crispness on the surface and a soft, sweet, delicious center that held its shape and was not soggy.
The dark coating on the slice in the photo isn't char, my friends, it's caramel. This recipe calls for more sugar than you might expect. I believe he recommended 2tbsp sugar per Cup of milk or cream. He also recommends a sprinkle of additional sugar while cooking. This is what created the caramelized crust you see in the photo. I was worried that my French Toast would be too sweet, but it was just right with the pat of salted butter and sugar free syrup I used (gotta cut back somewhere lol). Cookie Monster would like us to know that this French Toast is a sometimes food. I swear to golb my first thought upon taking a bite was "damn... restaurant quality...DAMN".
For one serving I used:
Two eggs
2/3c of Half and Half
1/8 tsp Vanilla Extract
1/8 tsp coarse kosher salt
2tbsp sugar
A very generous pinch of cinnamon and nutmeg
I really enjoyed making this recipe and I've added it to my list of simple meals to perfect for company.
I'm docking a couple of points for my own inexperience but this really is excellent. 8/10
#beginner cook#learning to cook#lgbtqia#lgbtq community#self love#self care#breakfast#french toast#adventure time#recipe link#food
0 notes